Cloudways has a built-in HTTPS redirect you can switch on in a few clicks, no code required. If you use WordPress, a plugin can handle it instead. And if you need more control, a short .htaccess rule works on any PHP application.
This guide covers all three methods, plus how to fix mixed content warnings after enabling the redirect and how to add HSTS headers for additional security.
Before You Start: Install SSL First
You must have an active SSL certificate on your application before enabling any HTTP to HTTPS redirect. Turning on a redirect without SSL in place will break your site. Cloudways supports two options:
- Free SSL certificate: issued by Let’s Encrypt and renewed automatically
- Custom SSL certificate: upload your own from a third-party certificate authority
Once SSL shows as active in your application settings, you’re ready to proceed. Not sure how to install it? See the guide on how to install SSL on Cloudways.
Method 1: Enable HTTPS Redirect in Cloudways (Built-In Toggle)
This is the fastest method and works for all application types hosted on Cloudways.
Step 1 – Log In to Cloudways
Go to platform.cloudways.com and sign in to your account.
Step 2 – Open Your Application
Click Applications in the top navigation, then select the application you want to configure.
Step 3 – Go to Application Management
Inside the application, click the Application Management tab, then select SSL Certificate from the left menu.
Step 4 – Enable HTTPS Redirection
Find the HTTPS Redirection toggle and switch it on. A confirmation dialog will appear, read the disclaimer and click Yes to confirm.
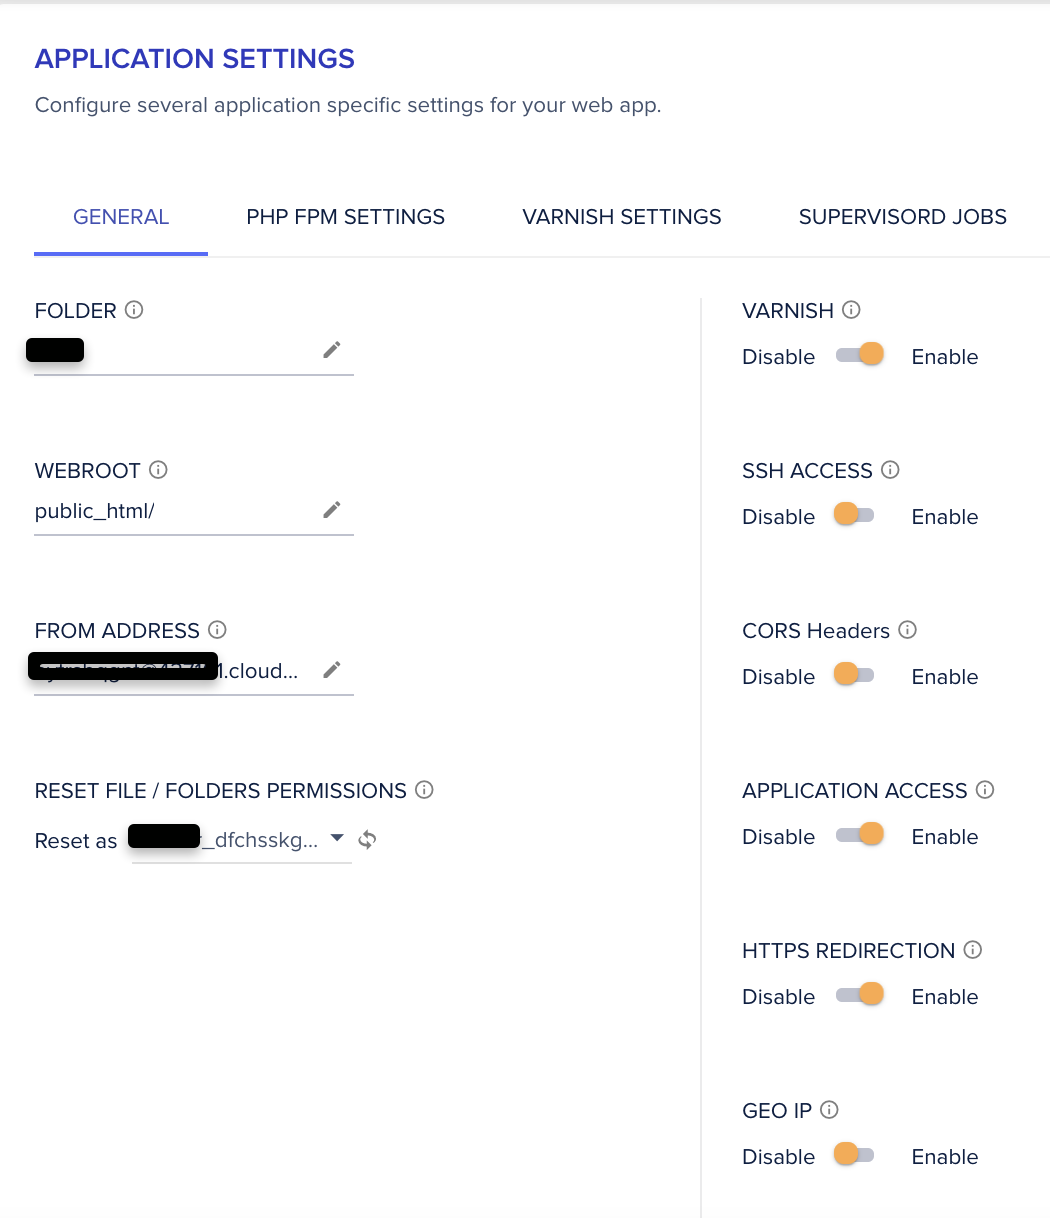
Cloudways will display a notification once the redirect is active.
Step 5 – Clear All Caches
Clear three layers of cache after enabling the redirect:
- Varnish cache: purge from the Cloudways Application Management panel
- CMS or plugin cache: clear from your WordPress cache plugin or other caching tool
- Browser cache: clear cookies and cache in your browser before testing
Step 6 – Verify the Redirect
Open a new browser tab and navigate to http:// followed by your domain. It should redirect instantly to the https:// version. If it does, the setup is complete.
If the redirect is not working and your logs show access errors, check for file permission errors on Cloudways as a possible cause.
Method 2: Force HTTPS With a WordPress Plugin
If your site runs WordPress on Cloudways, a plugin is worth using even alongside the built-in toggle. Plugins like Really Simple SSL also fix mixed content warnings by rewriting internal HTTP links on the fly, something the built-in toggle does not handle.
Step 1 – Install Really Simple SSL
In your WordPress dashboard, go to Plugins > Add New Plugin. Search for Really Simple SSL, then install and activate it. This is the most widely used SSL plugin, with over 5 million active installations.
Step 2 – Activate SSL Detection
Once activated, the plugin detects your SSL certificate automatically. Click Go ahead, activate SSL. The plugin updates your WordPress URL settings, adds the HTTPS redirect, and resolves most mixed content warnings in one step.
Step 3 – Test in a Private Window
Open a private or incognito browser window and navigate to the http:// version of your domain. It should redirect to https:// immediately.
Method 3: Redirect HTTP to HTTPS via .htaccess
The .htaccess method works for WordPress and other PHP applications on Cloudways. It gives you full control and does not depend on any plugin or dashboard setting staying enabled.
Step 1 – Open Your .htaccess File
Connect via SSH, or use the File Manager in Cloudways Application Management to open the .htaccess file in your application’s root directory.
Step 2 – Add the Redirect Rules
Add these lines at the top of the file, above any existing WordPress rules:
RewriteEngine On
RewriteCond %{HTTPS} off
RewriteRule ^(.*)$ https://%{HTTP_HOST}%{REQUEST_URI} [L,R=301]
Save the file and test by visiting your domain over http://, it should redirect to https:// right away.
Step 3 – Clear Caches
Purge Varnish and clear your browser cache after saving, the same as in Method 1.
Are You Using Cloudflare?
Cloudflare sits between visitors and your Cloudways server, so its SSL settings affect how the redirect works. The wrong combination causes an infinite redirect loop.
The correct setup when using both Cloudflare and Cloudways:
- Set Cloudflare SSL/TLS mode to Full (Strict)
- Enable HTTPS Redirection in Cloudways Application Management (or use .htaccess)
- Avoid Flexible SSL mode in Cloudflare, it sends HTTP traffic to your Cloudways server, which then redirects back to HTTPS, creating a loop
For the full Cloudflare setup process, see how to use Cloudflare with Cloudways.
Fixing Mixed Content After Enabling HTTPS
After enabling HTTPS, your browser may show a warning padlock or a shield icon instead of a clean padlock. This is a mixed content warning: the page is served over HTTPS, but some resources (images, scripts, stylesheets, or iframes) are still referenced with http:// URLs.
How to identify mixed content:
- Browser DevTools: open your browser’s developer tools (F12 or right-click > Inspect), go to the Console tab, and look for warnings that say “Mixed Content” with the specific URL of the insecure resource. The Network tab filtered to “http” shows every HTTP request the page makes.
- Why No Padlock: a free online tool (whynopadlock.com) scans a URL and lists every mixed content resource found. Useful for a quick scan without opening DevTools.
How to fix mixed content:
- Really Simple SSL (WordPress): the plugin’s content rewriter rewrites most http:// references to https:// on the fly. Enable it under Settings > SSL > Security Headers. This handles references in post content, widget text, and theme HTML.
- Database search-replace: hardcoded http:// URLs stored in the database (common with page builders like Elementor or Divi) are not always caught by the on-the-fly rewriter. Run a WP-CLI search-replace:
wp search-replace 'http://yourdomain.com' 'https://yourdomain.com' --all-tables --dry-run. Remove--dry-runto execute after reviewing the row count. - Theme and plugin static files: if the insecure resource is a script or stylesheet loaded by a plugin or theme using a hardcoded http:// URL, the fix is a plugin update (the author may have already patched it) or contacting the plugin author. Deactivate the plugin temporarily to confirm it is the source.
- External embeds: embedded content from third-party services (YouTube, Twitter, maps) loaded over http:// will block the padlock. Update embed codes to use https:// or the provider’s modern embed format.
HSTS on Cloudways (HTTP Strict Transport Security)
HSTS is a security header that tells browsers to only connect to your site over HTTPS for a set period of time. Once a browser receives the HSTS header, it will not make an HTTP connection to that domain for the duration specified, even if the user types http:// directly. This eliminates the window of vulnerability between the first HTTP request and the redirect to HTTPS.
When to enable HSTS: Only after your HTTPS setup is fully stable. If you add the HSTS header and then remove SSL or change domains, browsers that have cached the header will refuse to load your site until the max-age expires. Start with a short max-age to test, then increase it once you are confident the HTTPS setup is permanent.
How to add the HSTS header on Cloudways via .htaccess:
Add these lines to your .htaccess file, below your existing HTTPS redirect rules:
<IfModule mod_headers.c>
    Header always set Strict-Transport-Security "max-age=31536000; includeSubDomains"
</IfModule>
max-age=31536000 is one year in seconds, which is the standard recommended value. includeSubDomains extends the policy to all subdomains, remove this directive if any subdomains on your domain still serve HTTP content.
After adding the header, verify it is being sent by checking your response headers in DevTools (Network tab > click a request > Response Headers) or using a tool like securityheaders.com.
Troubleshooting HTTPS Redirects on Cloudways
Redirect Not Working After Enabling
If http:// still loads without redirecting, purge Varnish cache in Cloudways and clear your browser cache. Check that the HTTPS Redirection toggle is still showing as enabled in Application Management, it can occasionally revert after a deployment.
Mixed Content Warnings
A padlock with a warning symbol usually means some page resources (images, scripts, or stylesheets) still load over HTTP. Really Simple SSL resolves most of these automatically. To find specific problem resources, open your browser’s developer tools, go to the Console or Network tab, and filter for http:// requests. See the “Fixing Mixed Content” section above for the full process.
Infinite Redirect Loop (ERR_TOO_MANY_REDIRECTS)
This almost always comes from Cloudflare SSL mode set to Flexible combined with an active HTTPS redirect. Change Cloudflare to Full or Full (Strict) to fix it. It can also happen when .htaccess has conflicting rules, check for duplicate or contradictory RewriteRule entries.
SSL Certificate Not Valid or Expired
If the redirect works but browsers show a certificate warning, your SSL may have expired or been installed incorrectly. Check the SSL Certificate section in Cloudways Application Management and renew or reinstall as needed. Let’s Encrypt certificates renew automatically; custom certificates require manual renewal.
HTTPS Redirect for Non-WordPress Apps on Cloudways
The Cloudways HTTPS Redirection toggle works for all application types, not just WordPress. If you run Magento, Laravel, WooCommerce, Joomla, or a custom PHP application, you can use the same built-in toggle in Application Management. The .htaccess method (Method 3 above) also works for any PHP application that uses Apache as its web server on Cloudways.
For applications using Nginx, the .htaccess file is not used. Cloudways handles the server-block configuration through its stack. In that case, the built-in HTTPS Redirection toggle is the correct route, as it modifies the Nginx configuration directly. Manually editing the Nginx server block via SSH is possible but risks being overwritten by Cloudways platform updates.
For WooCommerce stores specifically, enabling HTTPS is required for payment processing compliance (PCI DSS). After enabling the redirect, run the database URL fix described in the mixed-content section above to convert hardcoded HTTP URLs in your product images, theme assets, and checkout pages.
Final Word: How to Redirect HTTP to HTTPS on Cloudways
The fastest path is the built-in HTTPS Redirection toggle in Cloudways Application Management, it takes about 30 seconds. WordPress users should also install Really Simple SSL to handle mixed content. Use the .htaccess method if you need a code-level solution that works independently of Cloudways settings. Once the redirect is working cleanly and there are no mixed content warnings, consider adding the HSTS header to lock browsers into HTTPS permanently. For the full security context including how this fits with Cloudflare Full (Strict) mode and infinite-loop fixes, see our Cloudways security and SSL guide. Ready to get started with Cloudways? Visit Cloudways to see current plans and pricing.